

Click title or picture for full article.
Poncho and Tarp Shelters
We will cover different shelters that can be built using the following items:
- Poncho
- Tarp / Tarpaulin
- Emergency blanket (mylar)
Basic knowledge of shelter building with these items is not just for survival purposes. During our quest to carry less gear during a backpacking trip we continue to experiment with different setups. Some people carry a hammock and a tarp while others purchase expensive backpacking lightweight tarps and sleep on the ground. We usually carried a poncho so we thought why not use it to build a shelter. We try to make it a point to carry items that can be multipurpose. A poncho can be used to build a shelter, capture water, obviously keep us and our gear dry, camo your belongings, if you choose a bright color it can be used for signaling, and the list goes on.
Your poncho can be used in many ways:
- Shelter
- Rain fly for your pack
- Wind deflector (cooking)
- Rain catcher
- Signaling
- Build a chair
- Keep your sleeping bag off the damp ground and many more. We will cover all the different ways to use a poncho in another article.
Types of shelter we can build include:
- Lean-to
- Lean to Super Shelter
- A-frame
- Jungle A-frame (poncho bed)
- Pit Shelter
- Tepee
- Hammock
- Hybrids
Note:
Most of the tarp shelters built in this article are based around a MILSPEC genuine military issue poncho. This type of poncho is becoming more difficult to find. There are a lot of military poncho replicas that are of lesser quality. While we preach being practical and getting the best gear for the money, your gear may be what makes the difference between getting home or not. A leaky poncho can become a nightmare. For this reason we will be adding pictures of the same shelters built with high quality backpacking tarps. There are several manufacturers making high quality tarps. Some models are the Aqua-quest series (The Camo, The Guide), ENO's Pro Fly, and Kelty Noah's Tarp. We would love to hear of others. Please send an email to: robert@practicalsurvivor.com.


Lean-to

Mylar blanket shelters
Called by many names:
* Space blanket
* Emergency blanket
* Mylar blanket
* Survival Blanket
Most are smaller than we would prefer. The following information will cover survival blanket shelters.


The emergency blankets are very compact and lightweight which promotes their popularity.
As with any other area of survival training, the equipment should be tested before an emergency. Specific shelters can be built with the normal sized mylar blanket (usually 84" x 52"). A lean-to shelter is achievable with the blanket but it is not proper size for an a-frame shelter. Please see the images below.


To build a lean-to, we will want to secure the blanket using cordage. Parachute cord works well in any situation. The blanket does not contain grommets so we are going to use a small rock or pebble to avoid cutting the blanket. Another option are after market clips such as grip clips and grabbit. Testing the tarp/blanket under heavy wind is important.
NOTE: This method should only be used under low wind conditions. It is best to use the blanket to simply reflect the heat from a fire source while supporting it with some type of wooden frame. The wind could easily shred the blanket and make it useless. If a basic lean to wooden frame is built, with the blanket tied to the inside of the shelter, the frame will protects the blanket and add to our insulation.
Wrap the corner of the blanket around the stone and then tie with the parachute cord. If done properly this will allow us to tie the blanket to a stake. Stakes can be made out of readily available materials. Here we make one out of branches from a fallen tree. We prefer to use "Y" shape branches.


Mylar comes in different thicknesses but, the majority of the emergency blankets sold are made of thinnest materials. It is a good idea to find out what 'mil' or thickness the blanket is made of. A lot of blankets are 1/2 mil. A reflective tarp is a good alternative.


This lean to would block some of the wind if the temperature dropped. Although it should help you to keep warm, it is not an ideal shelter by any means. It is unlikely the thin mylar would keep its structural integrity during high winds or heavy snow. We would build a wooden lean-to frame with several sticks to help hold up the Mylar blanket. We would use the Mylar blanket to help keep the rain out and reflect heat from the fire.
If the plan is to wrap in the blanket during a survival situation, this is what can be expected.

An alternative to a mylar blanket is the use of a tarp. Tarps can be purchased in department stores, hardware stores and lightweight tarps can be purchased from camping stores. Some survival tarps are sold with a reflective side which should help reflect the heat from your body or a fire. We have used the reflective tarp to help block the wind while cooking and to reflect heat from a fire in a lean to shelter. With the fire to the front of us and the reflective blanket behind us to block wind and reflect the radiative heat.


Advantages of using a tarp or poncho
The material on the tarps and ponchos is thicker and less likely to tear. They usually have grommets installed. This simplifies building our shelter and makes it less likely to tear from the wind. Tarps can be purchased in different sizes. If the poncho includes snap closures they can easily be attached together to make a larger shelter.
Lean-to Super Shelter
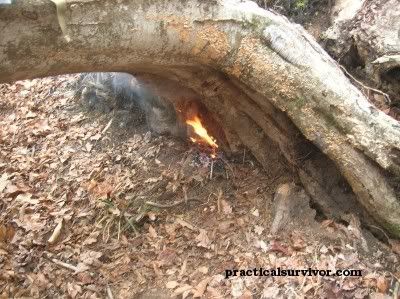
This shelter uses both a tarp and a mylar emergency blanket. Mors Kochanski designed the super shelter. Commonly seen in a dome-like geometry, it can also be built using a lean to. With some slight modifications, we built a raised bed to allow room for a cold well, filled the gaps with leaves and used a parallel log fire to keep us warm throughout the night. We were able to raise the temperature in the shelter 40+ degrees Fahrenheit with minimal insulation. Had they been available, we could have added hot rocks in the shelter to raise the temperature further. One of the many advantages of this shelter is the option to dry our clothes and gear.


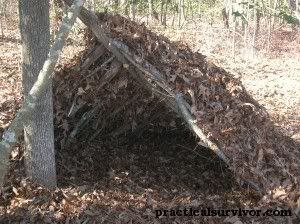
A-Frame shelter
An a-frame shelter can be built using branches and leaves. This would be referred to as a debris shelter. One of the reasons we prefer to carry a poncho is the built in snaps that allow multiple ponchos to be easily attached. Attaching two ponchos together we are able to quickly set up a poncho a-frame shelter. If a larger tarp is carried, the shelter can be built by simply attaching cordage in between two trees. In the images below, we use two military ponchos to build an A-FRAME shelter. The a-frame shelter is simply two lean-to shelters facing each other.

There are two different ways to tie the ponchos to the support trees.
1. Use the cordage as a spine to the shelter (ridge line).
2. Tie each end of the poncho through the grommets.
Here we use a Taut line knot to tie the end of the ponchos through the grommets. (See below)

Fallen branches can be used to make wooden tent pegs. We always try to find a surface area to cut against. Cutting one end at an angle helps us to more easily press the stakes into the ground. Push the stakes on each corner making sure the walls of the shelter are stretched out tight. This will help any precipitation run off the walls.


Tarp A-frame shelter
A common shelter is the a-frame tarp shelter. Here a tarp is used to make the two walls and a plastic sheet can be added for flooring. Cord is be tied between two trees to hold up the tarp.

Jungle A-frame shelter
This shelter helps keep the survivor off the ground and away from insects and snakes. We build and A-frame using seven poles. On this picture we were able to find a tree with a bend to save cutting.

Two a-frames are built with four poles then a ridge pole runs between them.


A poncho is stretched across the ridge pole to form a roof. A second poncho is used to create a bed.
Depending on the rain and wind, this shelter can be modified. Below we bring the cover poncho much closer to the bed and one side is adjusted down. Lowering one corner slightly more will keep the rain from puddling.

On most poncho shelters, it is usually a good idea to tie the poncho hood to avoid water leaking into your shelter. Please see image below:

More detailed instructions can be found in the following article: Jungle A-frame Shelter
Note: If the tarp or poncho does not have grommets, use the stone method shown above. Grommets allow us to build the shelter faster by using a carabiner. Shown below:


Pit Shelter

There will be situations where trees are not readily available. Whether in desert or coastal survival, a poncho can get the survivalist out of the sun and wind. During the day the sand pit shelter will keep us away from the radiative heat of the sun and the wind. If the materials are available insulate the floor of the shelter.
Note: Stones can be used to raise the shelter during the day to allow breeze into the shelter. At night the tarp or poncho can be lowered to keep warmth in. If multiple tarps are available, a multilayer design would help to keep the temperature down during the day.


Poncho Hammock Shelter
If using a high quality poncho, it can be tied up and used as a hammock. A second poncho or tarp can be used as a rain fly. For this particular configuration we used Perry Peacock's Wilderness Innovation PSS Poncho Survival Shelter. Wilderness Innovation manufactures fantastic high quality gear. Their attention to detail is evident from the moment you open your package. With the use of paracord and bungees we created a cozy and dry sleeping platform. This is a warmer weather option unless you have the right equipment. With a pad and a sleeping bag we were comfortable in the 30s. If a larger tarp is available, it can be configured to minimize air movement under the hammock.


We experimented with pieces of a parachute and some other configurations as well.


Hybrid shelters
We can experiment with different poncho shelters during each backpacking trip. By trying the carabiner to the parachute cord carrying a few stakes, we can put up a shelter in minutes. Staying out of the elements during an emergency can make all the difference.
In this set of pictures, we did not have to deal with rain. If possible rain was expected, then the "roof" of the shelter should be built with in a slant and cascade the poncho or tarp to avoid leaks. The tarp or poncho shelter can also be used as a rain catcher for drinking water.


Below we use two ponchos, three stakes and two cords attached to carabiners to build a this makeshift poncho shelter.


Please take a look at relevant shelter articles:
How to build a Lean-to shelter

Click title or picture for full article.
Click title or picture for full article.
Click title or picture for full article.

Click title or picture for full article.

practicalsurvivor.com is licensed under a Creative Commons Attribution-Noncommercial-No Derivative Works 3.0 Unported License.